Looking for creative DIY container garden projects? Micro Gardening in containers offers you SO many benefits. If you are a beginner or need some ideas to get started, I’ve compiled these tutorials to inspire you – regardless of your space, skills or budget!
 I change the flowers in these bright pink gumboot planters seasonally – an easy way to upcycle outgrown boots. I also plant in my adult pairs when they split. Just drill holes in the soles! I put tiny pots into the top of this pair & they sit nicely with a clay worm as garden art.
4 Steps to Create your DIY Container Garden
You can make a new or repurposed planter for a herb, vegetable, ornamental or flower garden in just a few easy steps:
Step 1: Choose your planter.
Step 2: Check sufficient drainage holes or add as required in the base.
Step 3: Add Potting Mix – use my free potting mix recipe, revitalize old potting mix or use your own preferred mix.
Step 4: Add your plant(s), seeds or seedlings, top with mulch and water in well.
Tutorial via Simply Healthy Farm
6 DIY Container Garden Projects
Many of us declutter each year or season and especially when we move. So look at how you might be able to repurpose old containers. Rethink how you could repurpose old baskets, shoes, crockery, furniture and garage items for a new use in your garden. Find ways to tread lighter on the planet, rather than always opting to buy new!
TIP: Remember if you are planting edibles, try to choose a safe container for food gardens.
Here are a few container garden projects you can try:
1. Drawer Planter Cache Pot. I’ve picked up old wooden boxes and drawers from garage/farm sales and op shops. Or repurposed items from our shed and used them as ornamental planters. Rather than ruining a wooden container by filling it directly with moist potting mix, there’s a solution! Simply put plants in smaller pots or containers INSIDE the outer cache ‘pot’. So the moisture in the soil won’t rot your lovely planter.
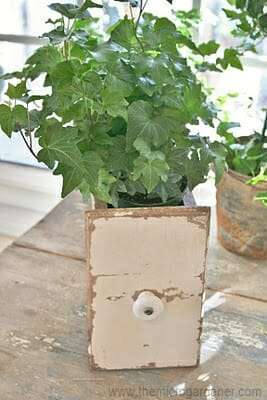 With a coat of non-toxic paint and a light sand, you can create a charming repurposed drawer planter.
Tutorial via Ironstone and Pine.
TIP 1: Remove pot plants for watering so your wooden planter lasts much longer.
TIP 2: Add coconut fibre or sphagnum moss around your plant as mulch and to hide the pots inside. Lift out when you want to water.
CLICK BELOW for resources to make your container garden projects
Affiliate Links: Your support of this site is appreciated!
2. Hessian/Burlap Wrap. This is one of my favourite ways to give pots a makeover. ‘Plain Jane’ plastic pots, even broken or mismatched ones can all be given an individual update or you can create a coordinated collection. For large pots, cut hessian to size by laying the pot down on its side for measuring. Allow extra at the top for folding in. Secure the hessian around the base of the pot with a few stitches or hot glue gun then fold the top edges inside the top of your pot to the level of the mulch. A tie around the rim will hold it in place.
TIP 1: Using thread and needle, keep your rope or string tie in place with a few stitches in the hessian.
TIP 2: You can slide the hessian pot wrap down so you can hose it off when you want to repot and reuse it again.
 With a small amount of cheap fabric, you can revamp ugly or mismatched pots & give them a stylish makeover.
A hessian bow in another colour can also give your pots a great new look. I created this hessian herb pot collection with frayed ribbon together for the Queensland Garden Expo.
 I loved covering these ugly black plastic pots with contrasting hessian colours to use for herbs. They last well and are a lot classier!
TIP 3: Once your hessian is worn and reached its natural life, simply cut it up and compost it! As a natural fibre, it will break down and build your soil.
3. Tiered Vertical Basket Planter. Limited space? This solution maximises growing area and minimises water loss by filtering down to the baskets below. Check out the tutorial via A Beautiful Mess.
TIP 1: Line the basket first with coconut fibre (coir peat) before adding your potting mix to lengthen the life of your baskets.
 A nest of baskets from discount stores would suit this planter or repurpose pre-loved baskets for a cost-effective option.
TIP 2: Consider the mature height of your plants before arranging them in the baskets!
4. Colourful Low Cost Bucket Planters. For less than a dollar, a plastic bucket can be turned into a portable or hanging planter. Just use the handle and an ‘S’ hook!
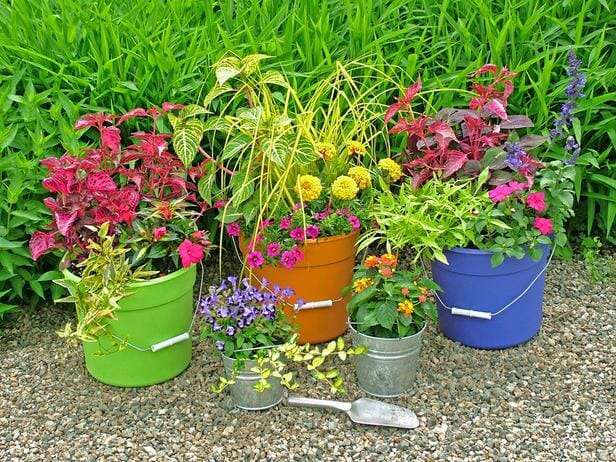 Beyond the Pail – these low cost colourful buckets grouped together make a colourful option for a children’s garden & make a great gift.
5. Distressed pots. I have a country garden so aged and vintage planters often find their way here. You can create this look quite simply with paint and coarse grain sandpaper.
 With your favourite non-toxic paint and some sandpaper, you can create a charming vintage look to your terracotta and unglazed clay pots.
Here’s another version – I painted these pots in contrasting colours for the rim and saucer and reversed them as pairs of pots, then filled with colour coordinated flowers.
6. Wooden Crate Planter. It’s a matter of personal choice whether you leave timber bare, treat it with oil or paint to preserve it. I think timber boxes make wonderful portable container gardens. If you use the box as a decorative outer ‘cachepot’ and add smaller pot plants inside, you can also change these with the season.
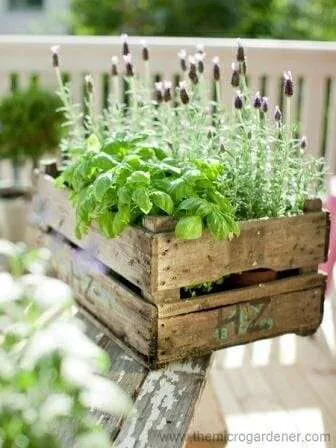 Try theming your container garden with herbs (medicinal or culinary), flowers, edibles like salad or stir fry greens or a feature perennial plant like a chilli bush.
TIP 1: Line your box with weed mat if you want to plant directly into it to minimise moisture contact with the wood. This also makes re-potting easy. Just lift the 4 top edges of the weed mat liner out so you don’t damage your plants!
TIP 2: Searching for wooden boxes and crates? Try your local recycle centre, garage/farm sales, green grocer, landscape yard or secondhand building supplies store. If you still can’t find what you’re looking for, make your own box by upcycling a wooden pallet cut to size.

This old bicycle was mounted on the fence as GARDEN ART with pretty flowers planted in rustic containers. The frame and wheel spokes were the perfect trellis for the climbing grape vine. Get creative with YOUR container garden projects!
I hope these ideas have inspired you to start your own container garden project!
Some of the links in this post are “affiliate links.” This means if you click on the link and make a purchase, I will receive a small commission. I only recommend products or services I use personally or believe will add value to my readers. Please read my Disclosure Statement for more details.
Like this article?
Please share! Join my free Newsletter for more exclusive insights, tips and all future articles.
© Copyright Anne Gibson, The Micro Gardener 2016. https://themicrogardener.com. All rights reserved.




This page is an amazing find ! I found a couple of old identical bicycles in a shed on the back of my property, and I also recently added a bathtub to my backyard garden that I lugged home (it was going out to trash on my street). It is genuinely ugly, but it I saw the usefulness of its mere size. Now I can’t wait to include those bicycles. I never would have thought of using them as a trellis.
There is also a rubber boot that must have been on someone’s tailgate, it has been in the middle of a main road near my house for a few days now. Looks like my dog and I will be venturing to pick it up and planting in that too. Thank you so much for the great ideas ! Really inspiring post.
Thanks Haren – glad you enjoyed the post. Sounds like you have some BIG projects to do now. Would love to see them when finished if you’re happy to email pics. Or feel free to post on The Micro Gardener Facebook Page. We have lots of creative DIYers who love being inspired with ideas. Have fun.
Hi, your blog is amazing! All of your ideas as so easy to realise! Here is another intersting article that includes growing plants in containers.
https://medium.com/@desireethomson/turn-your-apartment-into-a-small-garden-98fc345098f5
Hi there! Great ideas, and thank you for sending them to me. I would like to suggest old library carousels for small potted plants… good for growing both shade and sun plants together, as you can turn the carousel around to wherever the sun is shining. For added benefit, put a small dolley on the bottom so you can truck your mini-garden to whatever patch of sun you can find. Those carousels can hold a surprising amount of pots, too!
Thanks so much for the wonderful suggestion. I wonder where they would be available? Do you have a photo you can send me? I think that would be a fabulous vertical garden to create.
It’s wonderful seeing all these creative ideas for container gardening, yes, just about anything that can have a few holes and hold potting mix can be a container garden.
I really like what you are doing here, so will be adding your content on my Happy House and Garden website from time with a direct link back to you.
I have some old gum boots, so guess what. Plants are going in those.
Happy Gardening
Marty Ware
ps: You welcome to join if you like, would love to have you as a member as I am a small space gardener too!
Hi Marty
Thanks for stopping by – hope you enjoy your gumboot project. I have several pairs in my garden! Great to connect with another passionate micro gardener. Good luck with your site.
Ah, such great ideas, I would be implementing one of these projects into my garden, great!
Great article about container garden ideas. I am trying to figure out different types to put on my back deck as I restyle it and make it more of an urban garden. This really helps!
Thanks Angela. Glad you picked up some ideas. All the best with your urban garden project. 🙂
This was great. I hadn’t thought about the different ways I could do a garden. Now I can start planning. Thanks.
Great ideas – thanks. Am going to post this on Sibo’s FB site – Sibo (the little character in my series of books) is out to help save the world and she loves recycling.
Thanks Ginny – happy to share ideas!
I cant wait for the weather to get warmer here in the UK (I am a fairweather gardener I am afraid!) but I have lots of things to look forward to doing after reading all your tips.
Great Sue! Here we are waiting for it to get cooler so we can get stuck into more gardening! I hope you enjoy the site and your projects. 🙂
Thanks Fran. We have been very happy to receive the rain (492mm in just 4 days!) + much much more since because it was life-giving to the garden, particularly our shrubs and trees and refilled our dam. There were no reserves of moisture in the soil after 6 months of drought so I’m very grateful it has broken even if it is very wet under foot. SO glad you’ve been getting the rain too – dry and crispy isn’t a good look! Soak it all up. 🙂
Another wonderful post Annie. I hope you are all well up there in Queensland and that the floods and cyclone didn’t do too much damage to your gorgeous garden. At least a bit of rain was pushed down for us here in Tasmania, it has been SO dry here of late that everything was starting to resemble a 1970’s photo of my parents in sepia that had curled up at the edges…this rain is lovely 🙂